How to enable change history on any record page

In the recent post , we announced the GA release of Change History for the Skedulo Pulse Platform. Highlighted in the post was how Change History is enabled for Job, Asset, and Resource records ‘out of the box’. But what if you want to roll out Change History for additional standard or custom objects? Well, with Record Pages, we can do just that, and in this post, I’m going to show you how! 🥳
There are a number of reasons why it might be worth considering enabling Change History on a record page beyond Job, Resources, and Asset records. For example:
-
Relying on system audit fields isn’t always enough. System fields such as Created By or Last Modified By will absolutely give you the record creator and who last modified the record, but that’s where they stop. They don’t tell you explicitly what fields were changed and, more over, what the data changed from and to. System Administrators do have access to Change History via the Settings menu, however, additional users often need to see this information too, and having it available directly on the record makes it incredibly convenient.
-
Regulated industries, such as those within health markets (but certainly not limited to), are often required to add additional layers of security and tracking to ensure access to sensitive data (e.g. PII / SPII) is both appropriate to the user and that the changes to data are auditable. This can often present as requirements from the business to display Change History data to users across your organisation.
-
Automations & Integrations are common amongst enterprise SaaS applications, and Skedulo is no different. There are often upstream, and downstream applications and/or workflows involved in scheduling deskless workforces and having visibility of data changes is often important to users in order to validate connected systems are functioning and processing updates correctly.
-
Cross-functional teams. It’s common that data is accessible and editable by a number of teams within organisations. This often results in many users making changes to data. Having the additional context of who made the change and when can accelerate users when servicing customers and working through potential errors or data quality initiatives.
Don’t be too concerned if your reason is not on the list above, there are a myriad of reasons why you might elect to enable Change History across multiple objects within your Skedulo Environment. The most important thing is to just take a moment to consider if you should, when you should, and where you should.
Enabling Change History on any record page
If you already have a custom record page created and just want to add the history tab, feel free to jump to the next section.
If your object is currently using the system-generated record page (this will be the case unless you’ve already created a custom record page for the object), go ahead and create a custom record page. Strictly speaking, for custom objects, you can simply override the existing ‘record-view’ page; however, as a best practice, I prefer to create a fresh record page that keeps the original version of the record-view page intact. You can learn more about overriding the default ‘record-view’ page here.
In this example, I’m going to create a custom ‘account-view’ record page. To do this, I first have to head to the settings menu, which is accessible by clicking your avatar in the top right corner and choosing ‘Settings’ from the dropdown menu.
In the settings menu (the bar on the left-hand), select ‘Platform Settings’ under the ‘Developer tools’ heading. You will then be able to see the list of all Pages within your environment. From here, click on “Create New” in the top right-hand corner to create a new page.
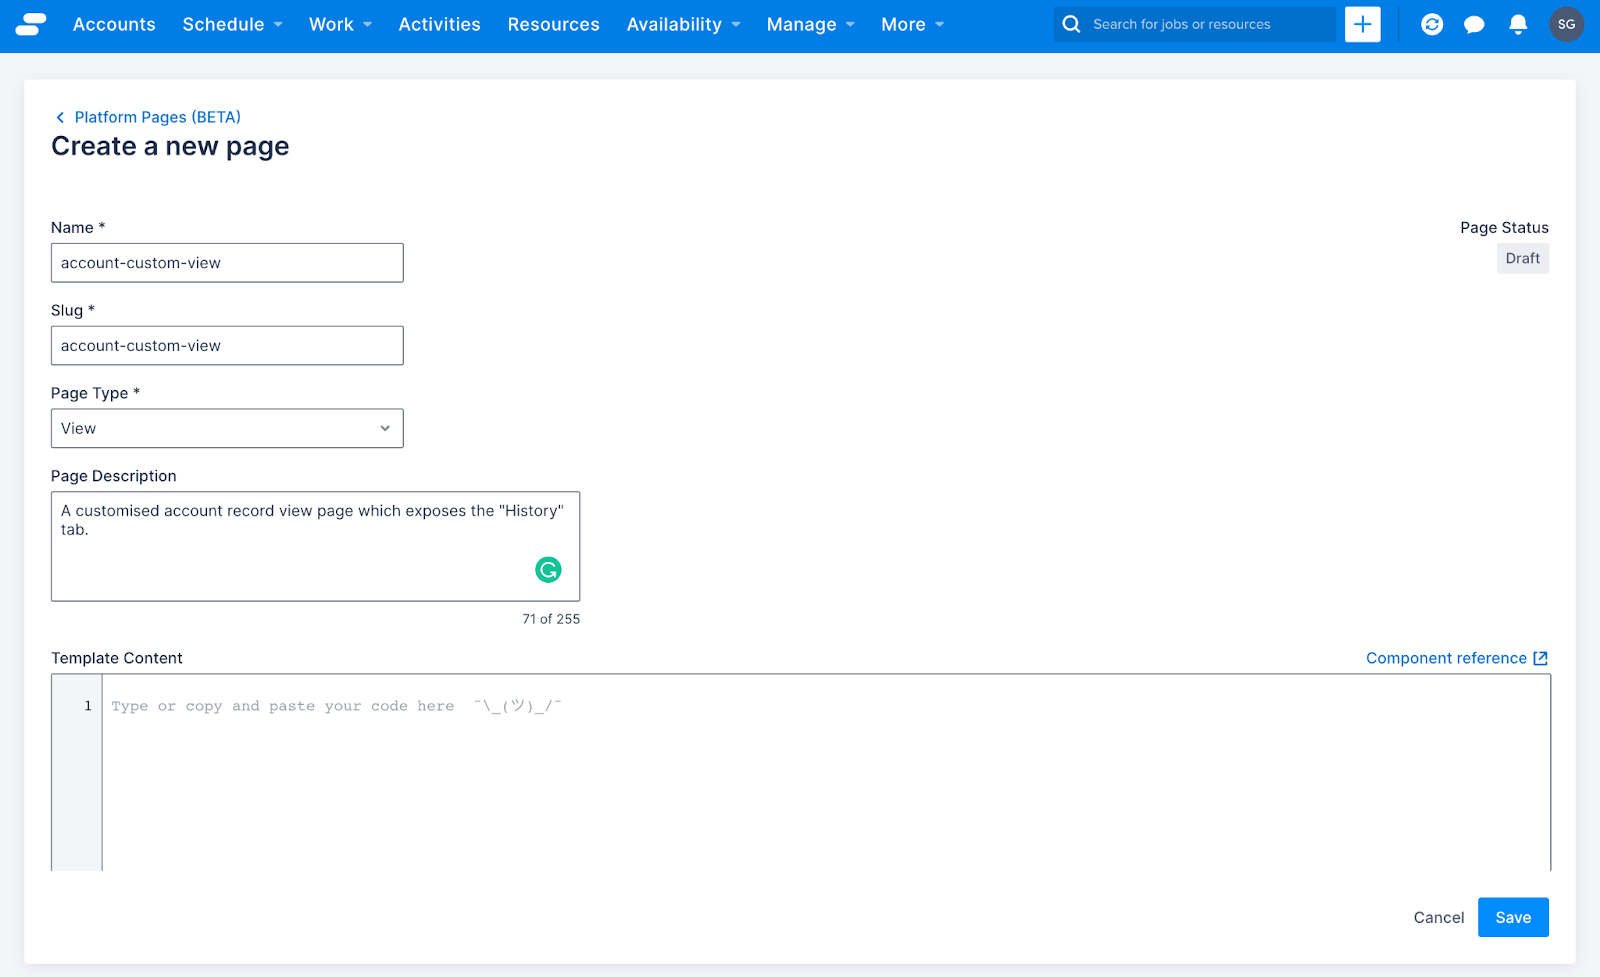
The below example will replicate the system-generated record-view page, with one key difference. Due to it being a custom record page, we are now able to create additional tabs. As this is a standard object, you can copy and paste the below example into a new page within your Skedulo environment without having to build an ‘Accounts’ object to replicate this functionality.
    {% extends "base-recordview" %}
    {% set resource_name="Accounts" %}

    {% block header %}
      <sp-split-row>
        <div slot="left">
          <sp-header style="margin-bottom: 0">
            <sp-column>
              <sp-heading size="2xl" level="1">
                {% block title %}
                  <platform-component package-name="recordpage" name="RecordDefiner"></platform-component>
                {% endblock title %}
              </sp-heading>
                <sp-row style="--sp-row-spacing: var(--sp-spacing-3); color: var(--sp-color-neutral-600);">
                  <sp-icon icon="details"></sp-icon>
                  <span>Account record</span>
                </sp-row>
              </sp-column>
            </sp-header>
        </div>
        <div slot="right" style="text-align: right;">
          <sp-header style="margin-bottom: 0">
            <sp-heading>

              <platform-component package-name="recordpage" name="RecordTemplate" template="{{ '<sp-link href="{{_.host.buildPlatformUrl("accounts-edit?uid=" + _.queryParams.uid )}}"><sp-button leading-icon="edit" button-type="primary" compact="">Edit</sp-button></sp-link>' }}"></platform-component>
            </sp-heading>
          </sp-header>
        </div>
      </sp-split-row>
    {% endblock header %}

    {% block body %}
         <sp-tabs selected="{{_.queryParams.selectedtab}}">
      <platform-component package-name="nav" name="ReflectiveTabs" search-param="selectedtab"
      tabs="{{  [
                  {"name":"details","label":"Details"},
                  {"name":"system-info","label":"System Info"}
                ]   |dump}}">
       </platform-component>

            <sp-tab-panel name="details">
                <sp-responsive-columns>
                    <div>
                        <platform-component package-name="recordpage" name="RecordFields" include-fields="{{ include_fields }}" exclude-fields="{{ exclude_fields }}" exclude-system-fields></platform-component>
                    </div>
                </sp-responsive-columns>
            </sp-tab-panel>
            <sp-tab-panel name="system-info">
                <sp-responsive-columns>
                    <div>
                        <platform-component package-name="recordpage" name="RecordFields" only-system-fields></platform-component>
                    </div>
                </sp-responsive-columns>
            </sp-tab-panel>

        </sp-tabs>
    {% endblock body %}
Add the history tab
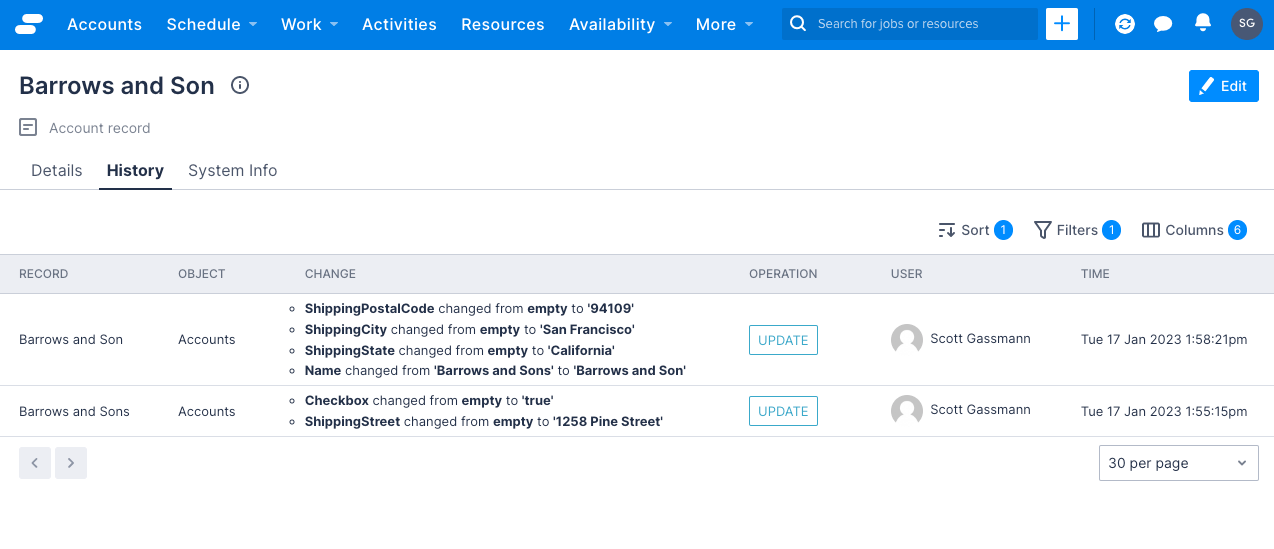
Now for the magic! We need to make two fairly minor adjustments to the custom record page to expose the list of changes that have been performed to the record over time, and because that’s quite a long tab name, I’m going to keep it simple and call it History.
Add a custom tab
Within the existing <sp-tabs>component, we are going to add the below line, this will establish the tab (albeit with no content).
{"name":"history","label":"History"}
The <sp-tabs> component should now look like this:
{% block body %}
  <sp-tabs selected="{{_.queryParams.selectedtab}}">
    <platform-component
      package-name="nav"
      name="ReflectiveTabs"
      search-param="selectedtab"
      tabs="{{  [
                {"name":"details","label":"Details"},
                {"name":"history","label":"History"},
                {"name":"system-info","label":"System Info"}
                ]|dump}}">
</platform-component>
The tab should also now be visible on your record page when you refresh. In the next step, we will add the list view component that will display the changes that have been made to the record.
Add the history list component
Add the <sp-tab-panel> component at the end of your record page (this should be just above the {% endblock body %} element). The ordering of the <sp-tab-panels> doesn’t change the ordering of the tabs presented on the record page (although keeping them in the same order can generally be helpful to quickly find sections of your page in the future)
       <sp-tab-panel name="history">
            <div style="padding-top: var(--sp-spacing-4)">
              <platform-component
                package-name="recordpage"
                name="RecordTemplate"
                template="{{ '{% if UID %}<platform-eventbus-scope closed><platform-component package-name="listview" name="ListView" query="entityId:{{ UID }}" resource-name="History"></platform-component></platform-eventbus-scope>{% endif %}' }}"
               ></platform-component>
              </div>
        </sp-tab-panel>
Completed code
Your custom record-view page should now look like the below example. The great thing about this example is that you can simply change the object name in the resource_name variable to replicate this for any other object. For example, {% set resource_name=”Accounts” %} could be changed to {% set resource_name=”Contacts” %}
   {% extends "base-recordview" %}
    {% set resource_name="Accounts" %}
    {% block header %}
      <sp-split-row>
        <div slot="left">
          <sp-header style="margin-bottom: 0">
            <sp-column>
              <sp-heading size="2xl" level="1">
                {% block title %}
                  <platform-component package-name="recordpage" name="RecordDefiner"></platform-component>
                {% endblock title %}
              </sp-heading>
                <sp-row style="--sp-row-spacing: var(--sp-spacing-3); color: var(--sp-color-neutral-600);">
                  <sp-icon icon="details"></sp-icon>
                  <span>Account record</span>
                </sp-row>
              </sp-column>
            </sp-header>
        </div>
        <div slot="right" style="text-align: right;">
          <sp-header style="margin-bottom: 0">
            <sp-heading>
               <platform-component package-name="recordpage" name="RecordTemplate" template="{{ '<sp-link href="{{_.host.buildPlatformUrl("accounts-edit?uid=" + _.queryParams.uid )}}"><sp-button leading-icon="edit" button-type="primary" compact="">Edit</sp-button></sp-link>' }}"></platform-component>
            </sp-heading>
          </sp-header>
        </div>
      </sp-split-row>
    {% endblock header %}
    {% block body %}
         <sp-tabs selected="{{_.queryParams.selectedtab}}">
      <platform-component package-name="nav" name="ReflectiveTabs" search-param="selectedtab"
      tabs="{{  [
                  {"name":"details","label":"Details"},
                  {"name":"history","label":"History"},
                  {"name":"system-info","label":"System Info"}
                ]   |dump}}">
       </platform-component>

            <sp-tab-panel name="details">
                <sp-responsive-columns>
                    <div>
                        <platform-component package-name="recordpage" name="RecordFields" include-fields="{{ include_fields }}" exclude-fields="{{ exclude_fields }}" exclude-system-fields></platform-component>
                    </div>
                </sp-responsive-columns>
            </sp-tab-panel>
            <sp-tab-panel name="system-info">
                <sp-responsive-columns>
                    <div>
                        <platform-component package-name="recordpage" name="RecordFields" only-system-fields></platform-component>
                    </div>
                </sp-responsive-columns>
            </sp-tab-panel>
           <!-- History tab -->
          <sp-tab-panel name="history">
            <div style="padding-top: var(--sp-spacing-4)">
              <platform-component
                package-name="recordpage"
                name="RecordTemplate"
                template="{{ '{% if UID %}<platform-eventbus-scope closed><platform-component package-name="listview" name="ListView" query="entityId:{{ UID }}" resource-name="History"></platform-component></platform-eventbus-scope>{% endif %}' }}"
               ></platform-component>
              </div>
            </sp-tab-panel>
        </sp-tabs>
    {% endblock body %}
Remember to update your list view configuration to point to your new record page. If you need a refresher, have a look at the Building beautiful list views in Pulse post by Alison Johnston.
As always, if you have any questions, please feel free to comment below or reach out to us @SkeduloDevs (We would especially love it if you were to tweet us with your completed example! 🚀)
Until next time, stay awesome 😎