Change History is now Generally Available
Do you want to be able to see who changed a record, what they changed, and when? Well, today we have great news for you; Change History can do just that and it’s now generally available (GA) for all Skedulo Pulse Platform customers!
With Change History, you can see changes to the following data:
- Standard data objects and custom objects
- Record data changed by all users, including by resources using the mobile app
- Changes made to record access policies, roles and users
- Scheduling rule violations
- Automatic changes to record data by the system
There are some exclusions that are not covered by Change History. These include:
- Changes made in the Settings (other than users, roles, and record access policies)
- Changes to the data model itself, for example adding or deleting custom objects or fields.
This great new feature is accessible in three ways:
- The settings menu in the Skedulo web app
- The record pages for Jobs, Assets and Resources (by default)
- The changes and transactions APIs
Let’s take a look at each of these ways to use it.
Administration Settings
In order to be able to see the Change History page in the settings menu of the Skedulo web app you must have administrator privileges (including being able to ‘view change history data’).
Head to the settings menu, which is accessible by clicking your avatar in the top right corner, and choosing ‘Settings’ from the dropdown menu.
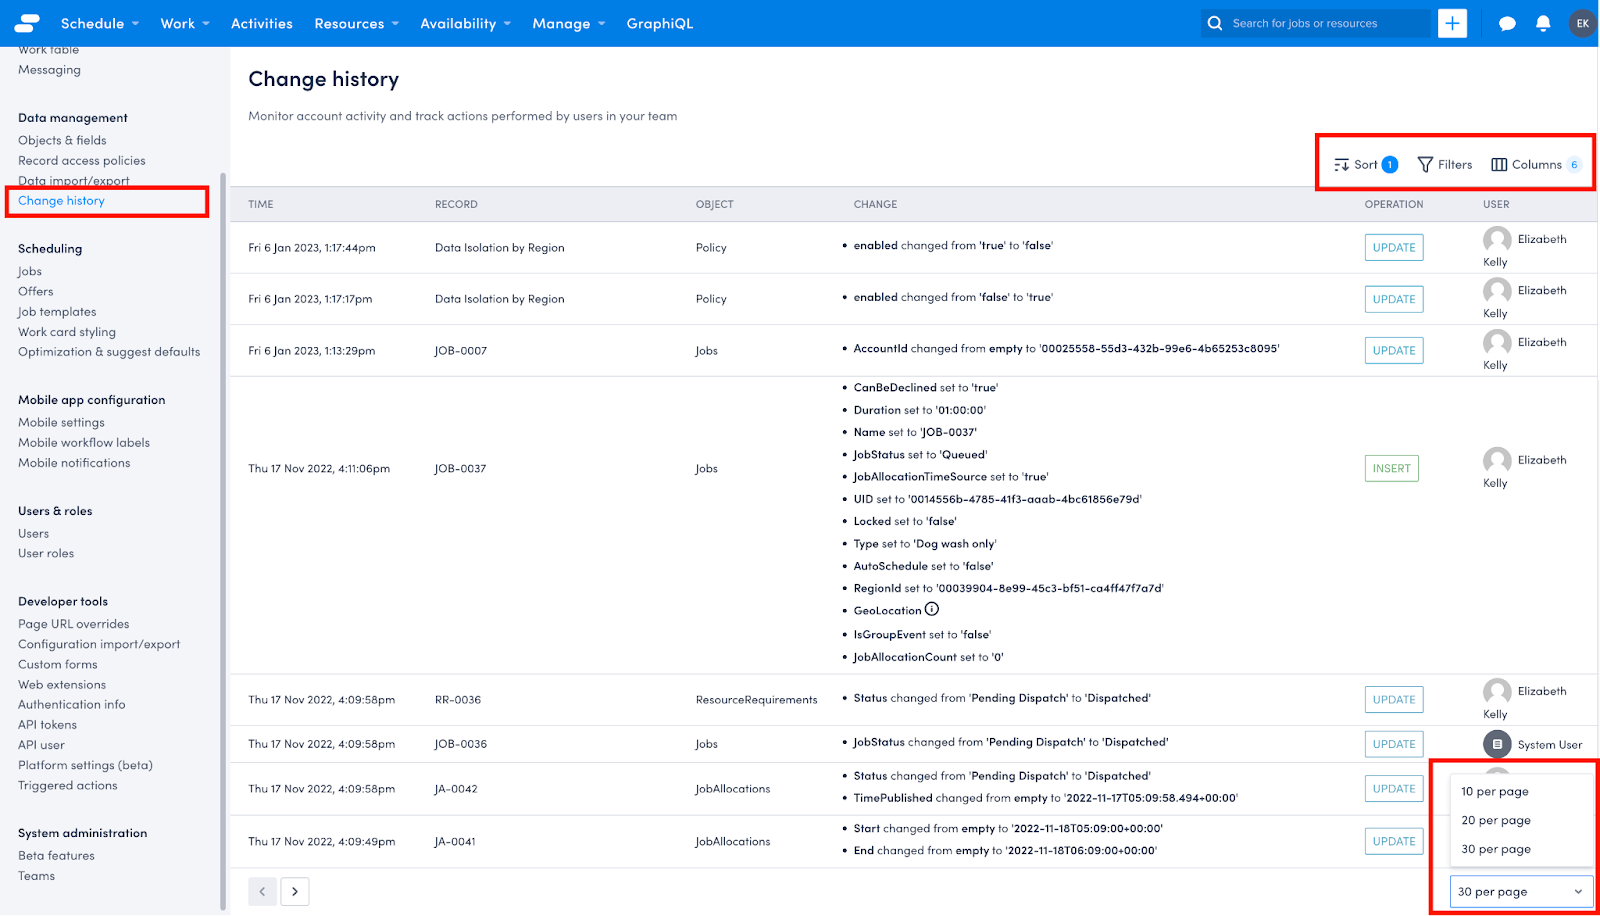
In the bar on the left hand side (the Settings menu), select Change history under the Data management heading.
You will then be able to see the Change history screen. This will show all changes for your Skedulo tenant. You can use the sorting and filtering controls to show the specific information you’re interested in.
You can also customise which columns are displayed, as well as the number of records shown per page.
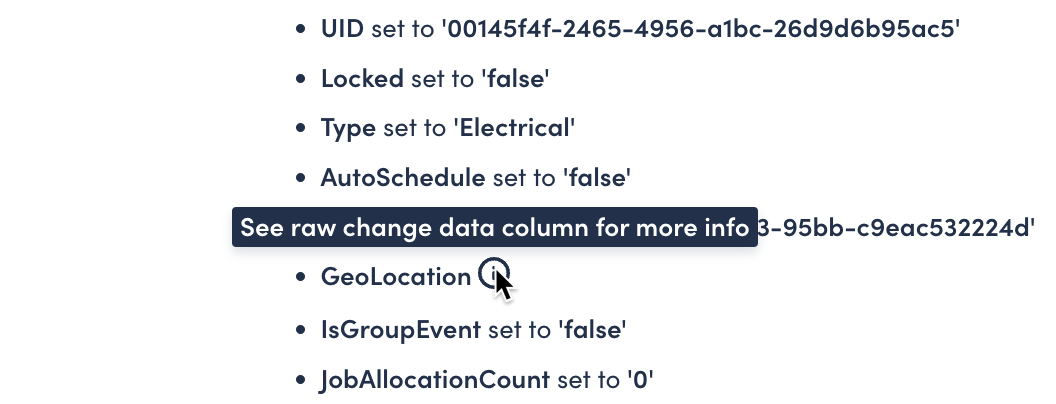
Some changes, such as GeoLocation are quite verbose and are thus not shown in detail. In order to see the detail you can click the information icon next to the change:
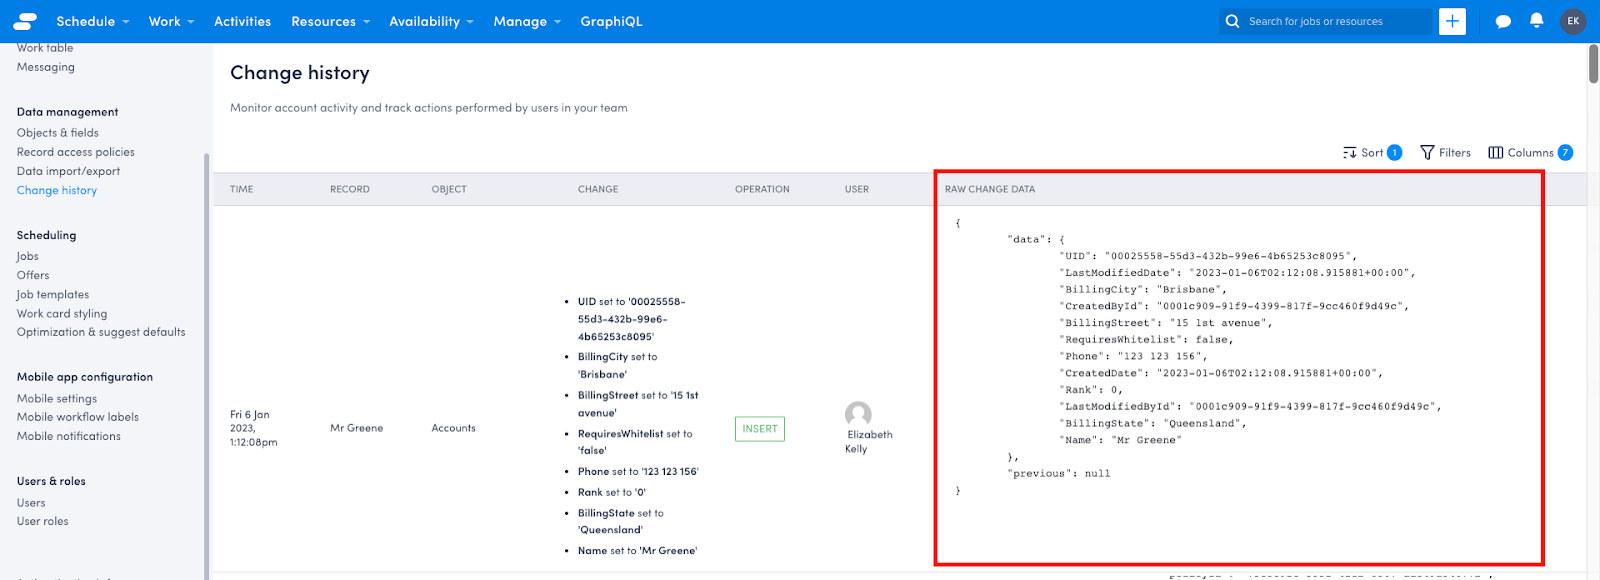
If you want to see the raw data, as it would be returned by using the Change History API, simply click Columns, then select Raw change data and click Apply.
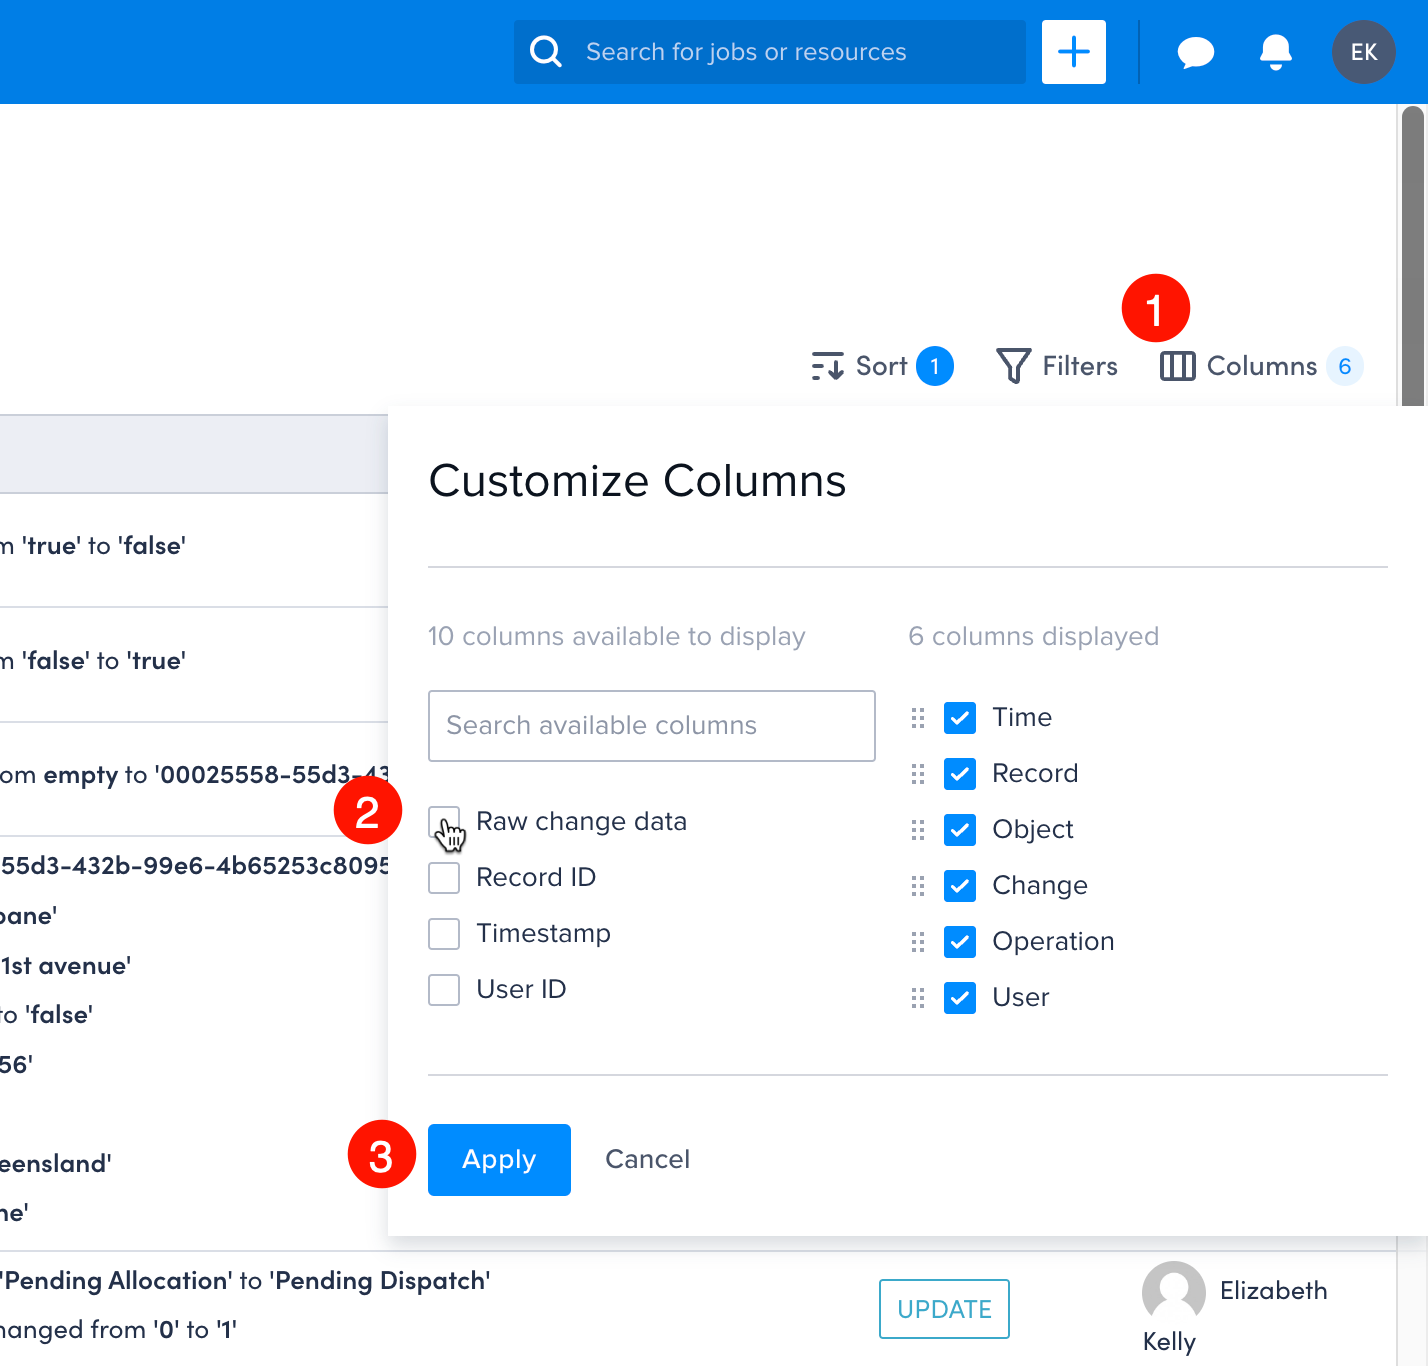
You will then be able to see the raw change data as a JSON blob from within the Change History list view.
Record Pages
The next way you can use Change History is via certain record pages. Currently this is available out of the box on Jobs, Resources, and Assets. However administrators can easily extend other record pages to display record history.
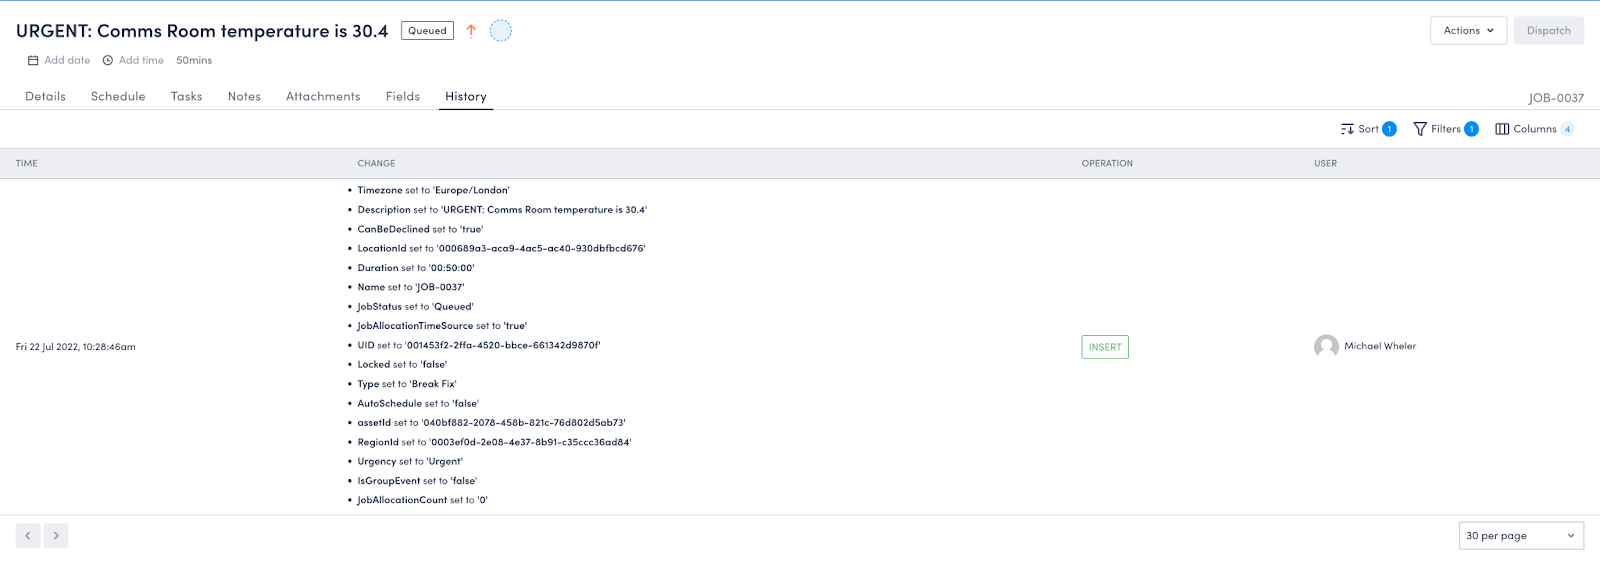
To view change history on a Job, Asset or Resource, open a record and then navigate to the ‘History’ tab. You will then be able to see the change history for that specific record.
Change History API
Finally, all of this wonderful change history information is available via an API. This allows you to build your own custom interfaces and solutions using this data. For example, you could use this API to synchronise data from Skedulo to a third party system.
Let’s take a quick look at how we can use this API and what it returns.
Of course, you will need an access token and to know the API host of your tenant. For further information on this, take a look at the developer docs here.
Armed with your token, you can now make requests to the Change History API.
There are two endpoints that return this information, the first is /events/changes and the second is /events/transactions.
The changes endpoint is great if you want a stream of changes as they’ve happened. This could be used to build user interfaces similar to the ones provided out of the box.
The transactions endpoint is geared more towards integrations, not only providing the changes but the broader transaction in which they occurred.
For example, making the following GraphQL request would cause both of these records to appear within a single transaction.
    mutation createJobsWithAllocations {
      schema {
        job0: insertJobs(input: {
          RegionId: "0003ef0d-2e08-4e37-8b91-c35ccc36ad84"
          Start: "2023-01-01T08:00:00+00:00"
          End: "2023-01-01T09:30:00+00:00"
          Duration: 90
          Address: "1 Small St, Bristol"
          Description: "fun with idAlias"
        } idAlias: "NEW_JOB_ID0")
       ja0: insertJobAllocations(input: {
          ResourceId: "0005f801-7a9c-40fe-8933-7886e0441e84"
          JobId: "NEW_JOB_ID0"
          Status: "Pending Dispatch"
        })
      }
    }
Changes
Making a GET request to this endpoint will return **all **record ****changes made within your tenant. The API will return pages of 100 records by default, ordered from oldest to newest. However, this can be changed by setting the limit (up to 500 records) and sortOrder parameters.
Here is an example of the response:
    {
      "nextCursor": "MTI2NDU1MTJ8MjAyMi0wNy0yMVQxNjo0MjoyOC40MjZa",
      "result": [
        {
          "occurredAt": "2022-06-06T08:52:06.289Z",
          "userId": "000195c2-1cad-409e-aa22-74181732b2c7",
          "entityType": "Preferences",
          "entityId": "00120ccf-4716-43d1-9870-4b73ff0bcc1a",
          "operation": "INSERT",
          "data": {
            "Set": false,
            "UID": "00120ccf-4716-43d1-9870-4b73ff0bcc1a",
            "Name": "AutoDeleteJobAssignments",
            "CreatedById": "000195c2-1cad-409e-aa22-74181732b2c7",
            "CreatedDate": "2022-06-06T08:52:06.289566+00:00",
            "LastModifiedById": "000195c2-1cad-409e-aa22-74181732b2c7",
            "LastModifiedDate": "2022-06-06T08:52:06.289566+00:00"
          },
          "previous": null,
          "metadata": {
            "action": "upsert org prefs"
          }
        },
        {
          "occurredAt": "2022-07-21T09:51:08.630Z",
          "userId": "000195c2-1cad-409e-aa22-74181732b2c7",
          "entityType": "Jobs",
          "entityId": "00149f20-7f8f-4f1f-b3fa-0696687f4504",
          "operation": "UPDATE",
          "data": {
            "End": "2022-07-21T12:07:00+00:00",
            "UID": "00149f20-7f8f-4f1f-b3fa-0696687f4504",
            "Name": "JOB-0034",
            "Type": "Upgrade",
            "Start": "2022-07-21T09:45:00+00:00",
            "Locked": false,
            "Address": "1 Small St, Bristol BS2, UK",
            "Duration": "02:22:00",
            "RegionId": "0003ef0d-2e08-4e37-8b91-c35ccc36ad84",
            "Timezone": "Europe/London",
            "JobStatus": "Pending Allocation",
            "CreatedById": "000195c2-1cad-409e-aa22-74181732b2c7",
            "CreatedDate": "2022-07-21T09:00:00.10242+00:00",
            "Description": "test",
            "GeoLatitude": 51.448745,
            "GeoLocation": "0101000020E610000094FAB2B4539304C02C9FE57970B94940",
            "AutoSchedule": false,
            "EstimatedEnd": "2022-07-21T12:07:00+00:00",
            "GeoLongitude": -2.571937,
            "IsGroupEvent": false,
            "CanBeDeclined": true,
            "EstimatedStart": "2022-07-21T09:45:00+00:00",
            "LastModifiedById": "000195c2-1cad-409e-aa22-74181732b2c7",
            "LastModifiedDate": "2022-07-21T09:51:08.63087+00:00",
            "JobAllocationCount": 0,
            "JobAllocationTimeSource": true
          },
          "previous": {
            "End": "2022-07-21T11:07:00+00:00",
            "Duration": "01:22:00",
            "EstimatedEnd": "2022-07-21T11:07:00+00:00",
            "LastModifiedDate": "2022-07-21T09:42:18.946767+00:00"
          },
          "metadata": {
            "source": "graphql"
          }
        }
      }]
    }
As you can see, the data is within the result array. This includes: the type of operation; when it happened; who did it; the previous value (if applicable); and some metadata about the change such as its source.
You will also notice the nextCursor field. This is how we get the next set of changes as well as keep track of where we are up to.
To get the next changes, simply make another request but this time append the cursor parameter to your request.
For example, making the following request would get the next set of records for the above result.
/events/changes?cursor=MTI2NDU1MTJ8MjAyMi0wNy0yMVQxNjo0MjoyOC40MjZa
There are also other parameters you can provide in order to filter the results you get from the API, such as start and end times, operations, users and more! There are details in the API documentation here.
Transactions
The other endpoint available is /event/transactions. This is largely the same as the /events/changes endpoint but as you may have guessed, the results are grouped by transaction.
However, the number of records returned by default is 10, and this can be set up to 50 by using the limit parameter.
Making a GET request to it would return a result like this:
    {
      "nextCursor": "MTI1Njc4ODJ8MjAyMi0wNy0yMVQwOTo0MTo0MC43MTE5MDFa",
      "result": [
        {
          "transactionId": "2358521814",
          "changes": [
            {
              "occurredAt": "2022-06-06T08:52:06.289Z",
              "userId": "000195c2-1cad-409e-aa22-74181732b2c7",
              "entityType": "Preferences",
              "entityId": "00120ccf-4716-43d1-9870-4b73ff0bcc1a",
              "operation": "INSERT",
              "data": {
                "Set": false,
                "UID": "00120ccf-4716-43d1-9870-4b73ff0bcc1a",
                "Name": "AutoDeleteJobAssignments",
                "CreatedById": "000195c2-1cad-409e-aa22-74181732b2c7",
                "CreatedDate": "2022-06-06T08:52:06.289566+00:00",
                "LastModifiedById": "000195c2-1cad-409e-aa22-74181732b2c7",
                "LastModifiedDate": "2022-06-06T08:52:06.289566+00:00"
              },
              "previous": null,
              "metadata": {
                "action": "upsert org prefs"
              }
            },
            {
              "occurredAt": "2022-06-06T08:52:06.289Z",
              "userId": "000195c2-1cad-409e-aa22-74181732b2c7",
              "entityType": "Preferences",
              "entityId": "0012dc09-4ed2-4b79-a7c1-dad5284e88ec",
              "operation": "INSERT",
              "data": {
                "Set": false,
                "UID": "0012dc09-4ed2-4b79-a7c1-dad5284e88ec",
                "Name": "TeamLeader",
                "CreatedById": "000195c2-1cad-409e-aa22-74181732b2c7",
                "CreatedDate": "2022-06-06T08:52:06.289566+00:00",
                "LastModifiedById": "000195c2-1cad-409e-aa22-74181732b2c7",
                "LastModifiedDate": "2022-06-06T08:52:06.289566+00:00"
              },
              "previous": null,
              "metadata": {
                "action": "upsert org prefs"
              }
          }
        {
          "transactionId": "2358721502",
          "changes": [
            {
              "occurredAt": "2022-06-06T10:37:59.977Z",
              "userId": "000195c2-1cad-409e-aa22-74181732b2c7",
              "entityType": "RollupMappings",
              "entityId": "03e84acd-3fb1-429f-b4df-b3b8820f033d",
              "operation": "INSERT",
              "data": {
                "UID": "03e84acd-3fb1-429f-b4df-b3b8820f033d",
                "Operation": "COUNT",
                "CreatedById": "000195c2-1cad-409e-aa22-74181732b2c7",
                "CreatedDate": "2022-06-06T10:37:59.9771+00:00",
                "ParentObject": "Jobs",
                "ChildToRollup": "JobAllocations",
                "RollupFieldName": "JARollup",
                "LastModifiedById": "000195c2-1cad-409e-aa22-74181732b2c7",
                "LastModifiedDate": "2022-06-06T10:37:59.9771+00:00"
              },
              "previous": null,
              "metadata": {
                "source": "graphql"
              }
            }
          ]
        }
      }]
    }
The main difference here is that under the result array, we have a transactionId and an array of changes. The data returned is otherwise in the same format as /events/changes, you can also provide the same parameters to the API in order to get the next page, or filter the results.
This API is useful if you want to be able to see all of the changes that occurred within a single transaction for example if you’re building an event driven integration to Skedulo.
Conclusion
We hope that you find the Change History functionality useful. We certainly believe that it will make keeping track of changes in your Skedulo tenant much easier and allow you to have a better overall picture of your data.
As always, we’d love to hear about what you’re building on the Skedulo Pulse Platform, and how Change History is a part of that, so please reach out to us on Twitter @SkeduloDevs or LinkedIn!