GraphQL 101, Part 4 — A look inwards, GraphQL Introspection

It’s time for Part 4 of our GraphQL 101 Series! If you’ve missed them you can check them out here:
-
Part 1 we covered accessing data.
-
Part 2 was using filters.
-
Part 3 was all about mutation and aliases.
Now, it’s time to get introspective!
As I touched on way back in the Part 1 of this series, GraphQL has the concept of introspection. This means that we can ask the GraphQL API to tell us about itself.
While having up-to-date API documentation is very important and even a necessity to allow developers to be productive, having an API that can tell you about itself is even better.
There are two main ways to get information about what the Pulse Platform’s GraphQL API can do; introspection queries and the schema endpoint. Once we’ve learnt about these ways of running introspection queries we’ll also briefly cover tooling that can automate this for you.
Introspection Queries
Introspection queries are a lot like “normal” data queries, however, rather than returning records they return information about the GraphQL API itself and what it can do. This is particularly useful when trying to understand what you can query for.
Let’s pretend we know nothing about Skedulo but want to find some data. Before we do anything else, we need to know what objects exist for us to query. To find this out, we can run a query like the example below to get the available schema types (aka. objects):
    {
      __schema {
        types {
          name
          kind
        }
      }
    }
You can see that this is very similar to a data query, but instead of asking for records, we’re asking for the different schema types with the name and kind fields requested.
This would return a response like;
    {
      "data": {
        "__schema": {
          "types": [
            {
              "name": "Jobs",
              "kind": "OBJECT"
            },
            {
              "name": "Accounts",
              "kind": "OBJECT"
            }
            //…more types
          ]
        }
      }
    }
Now that we’ve got this information, we can further dig into the objects. How about we take a look at the Jobs object in more detail?
We can perform another query to get a list of all of the fields on the Jobs object. You can see that we’re filtering by providing a type name, and that we’re also querying the fields, returning their name.
    {
      __type(name: "Jobs") {
        name
        fields {
          name
        }
      }
    }
You’ll notice this query is a little bit different, as we’re now querying the __type object, rather than the __schema object.
Making this query, we’d get a result back like this;
    {
      "data": {
        "__type": {
          "name": "Jobs",
          "fields": [
            {
              "name": "AbortReason"
            },
            {
              "name": "Account"
            },
            {
              "name": "AccountId"
            }
            //…more fields
          ]
        }
      }
    }
Finally, let’s dig a little deeper into the field information we get back. What if we want to know what the type is for each field?
As we learnt in Part 1, we can dig deeper by asking for related information in the same query. For example:
    {
      __type(name: "Jobs") {
        name
        fields {
          name
          type {
            name
          }
        }
      }
    }
This would return a result like:
    {
      "data": {
        "__type": {
          "name": "Jobs",
          "fields": [
            {
              "name": "AbortReason",
              "type": {
                "name": "String"
              }
            },
            {
              "name": "Account",
              "type": {
                "name": "Accounts"
              }
            },
            {
              "name": "AccountId",
              "type": {
                "name": "ID"
              }
            },
            //…more fields
          ]
        }
      }
    }
You can see here we have some familiar types, such as String and ID, but we also have a type of Accounts. This simply tells us that the Account field is a relationship to the Accounts object, and thus the object name is its type.
Now, let’s take a look at the Schema Endpoint.
Schema Endpoint
Introspection queries are great, but what if we want to get all of the information at once? Well, that is where the Schema endpoint comes in.
If we make a GET request to /graphql/schema endpoint, we will simply get back the entire GraphQL schema for our Skedulo tenant.
You’ll get back a response in GraphQL Schema Definition Language, which will look something like this:
type Jobs {
      AbortReason: String
      Account: Accounts
      AccountId: ID
      ActualEnd: Instant
      ActualStart: Instant
      Address: String
      AutoSchedule: Boolean!
      CanBeDeclined: Boolean!
      CompletionNotes: String
      Contact: Contacts
      //…more fields
    }

    type Accounts {
      BillingCity: String
      BillingPostalCode: String
      BillingState: String
      BillingStreet: String
      //…more fields
    }
    //…more types
As you can see, these responses tell us about the objects and what fields they contain and their types in a very similar way to running the queries in the previous section.
So this is great, but what can we do with it?
If you want a broader picture of your tenant’s entire data model, using the schema endpoint can be a great way to get this.
In fact, the neat autocomplete functionality provided by your API tooling often uses this endpoint as its data source, along with other tools that use SDL to visualize, or otherwise inspect, GraphQL Schemas.
Tooling
As you can see, introspection is super useful for finding out about what GraphQL can do. However, it becomes an even more powerful tool for exploring your schema and data when it’s combined with API tools such as Insomnia or Postman.
For example, let’s take a look at using Insomnia:
We need to create a new GraphQL request and provide the GraphQL endpoint for the Skedulo Pulse Platform, which is https:///graphql/graphql
You will also need to provide an authentication token. This is the same kind that you use for making any other call to Skedulo.

To do this, we select Auth and then Bearer. In the Prefix box we enter ‘Bearer’ and we put our token in the ‘Token’ box.
When we do this, Insomnia will automatically try and fetch the schema by performing introspection queries.
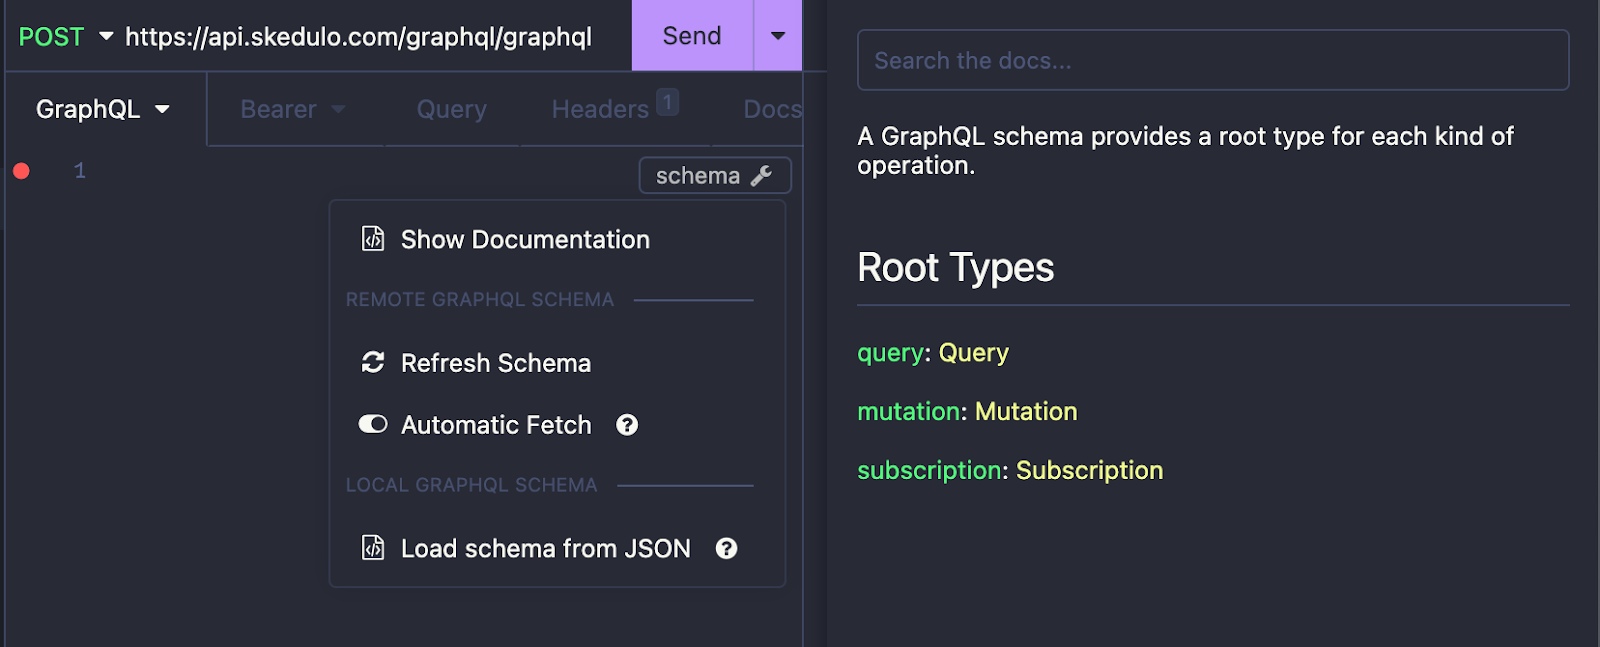
You should now see a ‘schema’ button in the body box., Click ‘Show Documentation’ to open a window to the side that allows you to browse the GraphQL schema.
The other useful functionality you get is autocomplete. Insomnia will begin suggesting objects and fields as you type, which can make it easier for you to construct queries and mutations when experimenting or browsing the schema.

If you prefer to use Postman, it also supports this and they provide further information here. Configuring requests in Postman is largely the same as in Insomnia.
If you just want to experiment without needing to set anything up, I covered how you can use the inbuilt GraphiQL tool from within the Pulse Platform in my post here.
Conclusion
Now you know how you can use GraphQL to tell you about GraphQL through introspection! I hope you’ll find this useful in your exploration of the APIs and it makes building applications on the Pulse Platform even easier!
Stay tuned for the final part in the series, where I take you through some extra tips and tricks to know when using GraphQL with the Skedulo Pulse Platform.
As always, we’d love to hear about what you’re building so please reach out to us on Twitter @SkeduloDevs or LinkedIn!