GraphQL 101, Part 5 — Tips and Tricks

Welcome to the final part in our GraphQL 101 Series! If you’ve missed any of the earlier parts in this series, you can check them all out by clicking here.
Today, we’re going to cover three topics to help you level up your GraphQL knowledge: upserting, batch requests, and visualisation.
Ready? Let’s go!
Upserting
As we covered in part four, you can use idAlias in order to insert multiple related records at the same time, but what if you need to do a similar operation after records already exist?
Well, we can do an upsert! Which, as the name implies, is an operation that does either an insert, or an update depending on whether the record exists or not. The good thing about an upsert is that you can match records either on UID, or a custom “External Id”.
In order to make use of this great feature, there are a couple of things we need to do first:
- Create a custom field to use as an External ID on the objects we want to upsert.
- Enable tracking on that custom field.
Those steps are covered in detail here, so once you’ve completed them let’s get into how to perform the upsert request.
These are made in the exact same way as any other GraphQL request we’ve covered so far but we call upsert rather than insert or update.
Here is an example of an upsert request:
    mutation upsertNewClientUpsert {
      schema {
        upsertCustomExternalObject(input: {
          Name: "Client Case Test"
          ExternalId: "ClientCaseNumber_ID01"
        }, keyField: "ExternalId")
      }
    }
If you’ve read the rest of the series, no doubt this is going to look very familiar. However, you can see we’ve set the ExternalId field to “ClientCaseNumber_ID01” and we’ve specified it as the keyField.
This request would result in a response similar to the following:
    {
      "data": {
        "schema": {
          "upsertCustomExternalObject": "042ad3bb-2c50-4fdf-b6e1-e2d25cdfd403"
        }
      }
    }
The upsert request tells the Pulse Platform to look for a record with the ExternalID set to “ClientCaseNumber_ID01” and if it finds one, perform an update with the data in the request. If no record is found, it will perform an insert instead.
So now, we can make the following request:
    mutation upsertNewClientUpsert {
     schema {
      upsertCustomExternalObject(input: {
       Name: "Change name"
       ExternalId: "ClientCaseNumber_ID01"
      }, keyField: "ExternalId")
     }
    }
And we will get the same response as earlier.
However, if we then get the record’s details by its ID as in the below example:
    {
      customExternalObjectById(UID: "042ad3bb-2c50-4fdf-b6e1-e2d25cdfd403") {
        UID,
        Name,
        ExternalId
      }
    }
We will get the following as a response:
    {
      "data": {
        "customExternalObjectById": {
          "UID": "042ad3bb-2c50-4fdf-b6e1-e2d25cdfd403",
          "Name": "Change name",
          "ExternalId": "ClientCaseNumber_ID01"
        }
      }
    }
As you can see, this means we didn’t need to know the UID of the record in order to make changes to it, which can be super helpful in data migration cases. For example, when you’ve got related records from another system that have IDs already and you wish to import them into Skedulo.
Batch Requests
Now, let’s talk about batch requests. As we learnt before, we can do multiple requests in a single call with aliasing and idAlias, and these are great for doing multiple inserts or updates of related data.
But what about if we want to do a large number of requests, or different kinds of requests (e.g. get some data, and store some data)?
Well, it’s time for a batch request. These are slightly different to the requests we’ve seen before. The first difference is that they need to be sent to the batch endpoint: http://api.skedulo.com/graphql/graphql/batch
The next difference is that they are sent in JSON format (which is also how other GraphQL requests are sent, it’s just normally our library or client formats them for us).
So, let’s take a look at an example request, where we sent two queries, one for regions and one for jobs):
    [
      {
        "query": "query { regions { edges { node { UID Name }}}}"
      },
      {
        "query": "query { jobs { edges { node { UID Name }}}}"
      }
    ]
As you can see, these look similar but are within the query key of our JSON object, which is within an array.
What we get back is also in the form of an array, but the content will look very similar to what you’re used to with other queries.
    [
      {
        "data": {
          "regions": {
            "edges": [
              {
                "node": {
                  "UID": "0003ef0d-2e08-4e37-8b91-c35ccc36ad84",
                  "Name": "South West England"
                }
              }
            ]
          }
        }
      },
      {
        "data": {
          "jobs": {
            "edges": [
              {
                "node": {
                  "UID": "00142b03-37c0-435c-9ce0-a35bd80fc8d6",
                  "Name": "JOB-0001"
                }
              },
              {
                "node": {
                  "UID": "00149f20-7f8f-4f1f-b3fa-0696687f4504",
                  "Name": "JOB-0034"
                }
              }
              //… more jobs
            ]
          }
        }
      }
    ]
As you can see, each query result is contained in a data object as normal, and these are returned inside an array.
If, for example, you need to do multiple queries, getting lots of data from different objects on page load batching can be a much more efficient way to do this.
If you want to learn more about how batching works at a technical level, check out this post on the apollo blog.
Visualisation
The last tip in this series is visualisation. As you know, we can use introspection in order to find out more about what is available within Skedulo, but sometimes that can be difficult for us to parse.
So, what if we want to generate a visualisation of our data model? Well, lucky for us there are GraphQL visualisation tools that will do this for us!
I’m going to talk about two here, one free and one paid.
The first one is the great open source tool, GraphQL Voyager. This can be run in two ways, either locally or from within Skedulo by deploying it as a web extension!
If you’d like to simply run it locally, check out the example here. Note: you will need to replace on line 50 of the HTML with your API token in order for it to work!
Once you have it running you can use it to visualise part, or all of your GraphQL schema. You can click each object, or use the sidebar to search and focus on that specific object and its fields and relationships!
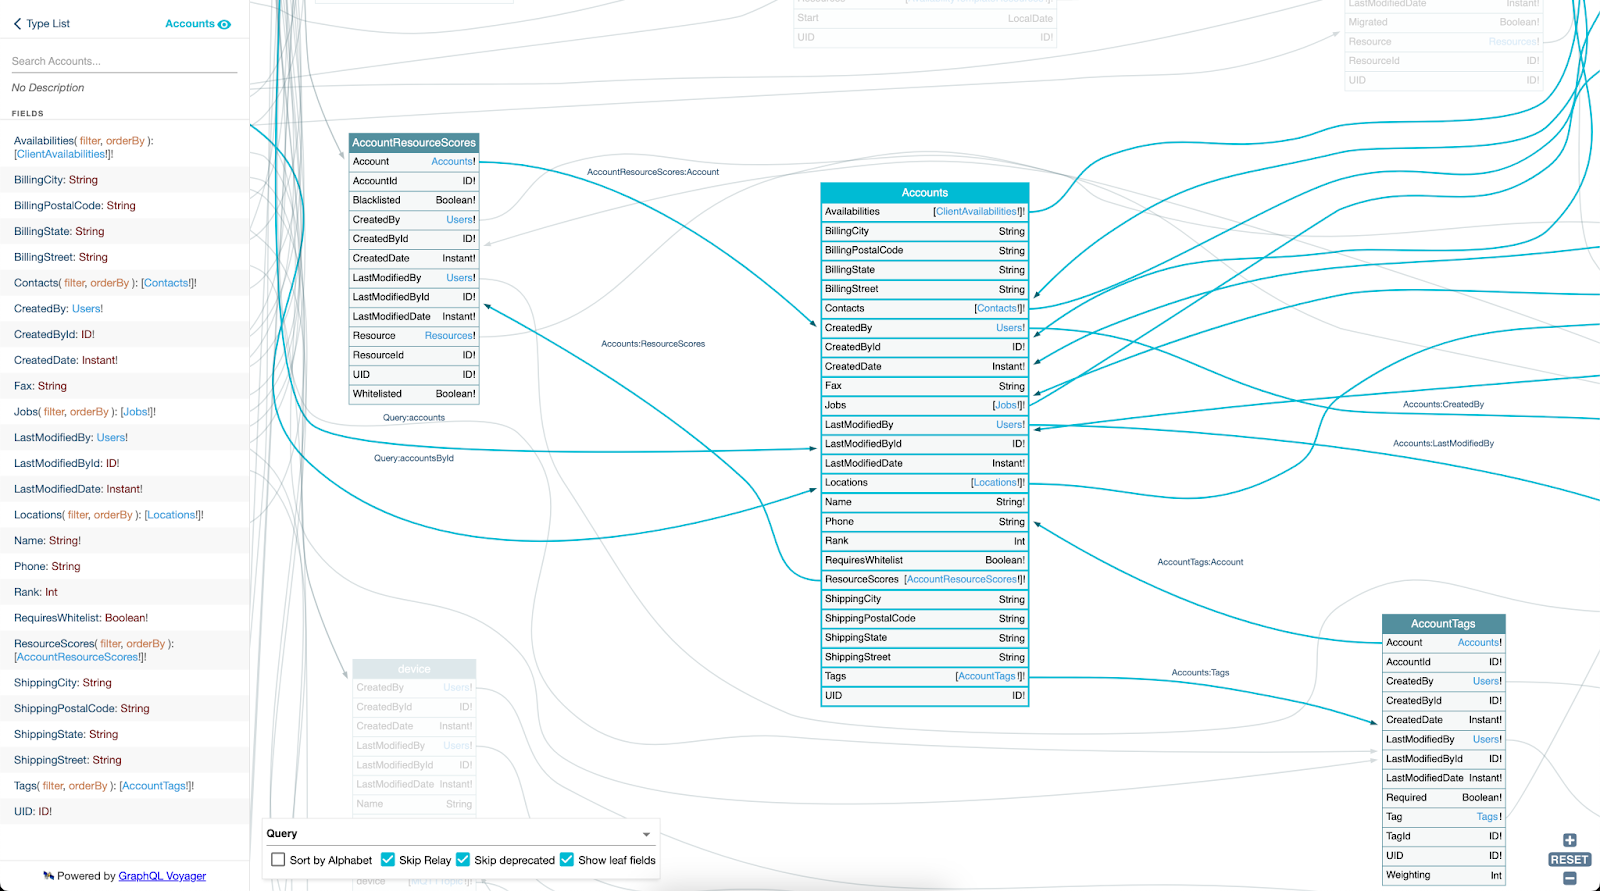
It is a very handy and powerful tool for getting a better understanding of your data model!
The second one is GraphQL Editor, this is a web based tool that you can use to visualise any GraphQL schema, including that of the Skedulo Pulse Platform. It has a 14 day trial, and they cover how to use it to visualise GraphQL schema in their blog post here. This tool also has many other features and doesn’t require installation.
Conclusion
That’s it for our GraphQL 101 series. I hope that you’ve found it useful and can take the tips and tricks from this post, as well as the previous posts in the series to build amazing experiences on the Skedulo Pulse Platform!
If you want to learn even more about GraphQL, the “How to GraphQL” series is an excellent place to start!
As always, we’d love to hear about what you’re building so please reach out to us on Twitter @SkeduloDevs or LinkedIn!