A low code guide to send Slack notifications with Webhooks.
On average, we use 110 SaaS applications to complete our work. Compared to a mere eight in 2015, a whopping 1275% increase! And with 10 million daily users from over 600,000 organisations, there is a good chance that Slack is one of those 110 apps you use. The good news is that there are several ways you can connect Skedulo with Slack to share updates across your organisation. In this post, I will share my low code guide on how you can leverage Skedulo Webhooks and Zapier to quickly send automated Slack notifications to keep your teams updated with the information they care most about.

What are webhooks?
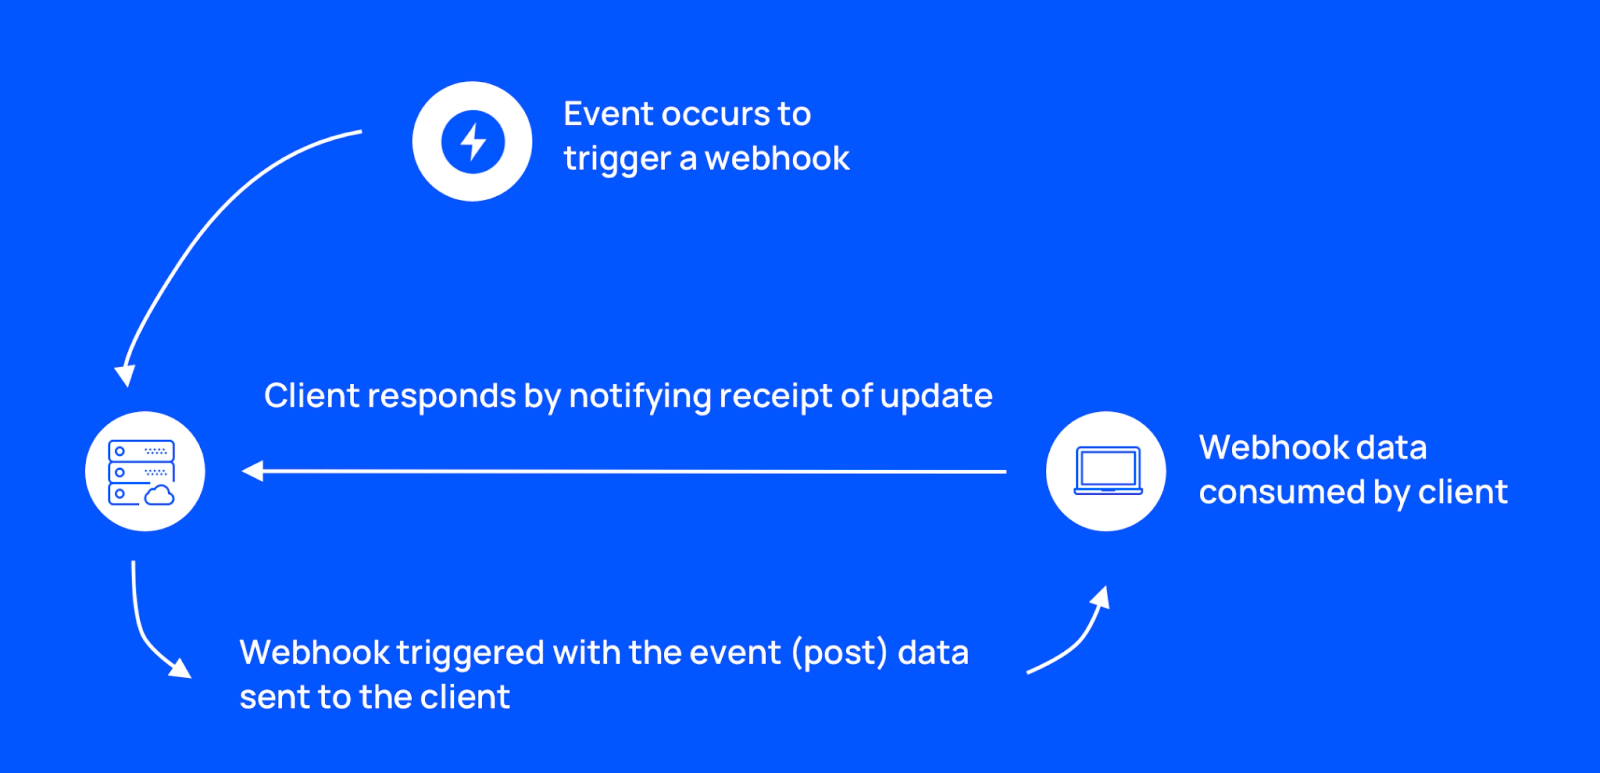
Webhooks are one of the common ways you can automatically trigger information to be sent to other apps or middleware. In the context of the Skedulo Pulse Platform, they are triggered when specific events or changes occur in your Skedulo environment.
Webhooks send the emitted event information (payload) to a specific URL that takes the payload and performs further processing. In the eyes of a webhook, the moment the webhook sends the event payload to the destination URL and confirms receipt, its job is done. The actual ‘processing’ of the webhook event data is performed by a secondary system/function, and it’s at that point, we will create the Slack automation.
Creating webhooks
A webhook is created by sending a POST request to the /webhooks endpoint along with a JSON body that defines the webhook. To build this automation, we will create a webhook where the JSON body contains four mandatory properties:
Name The name you want to give your webhook for easy identification.
URL The endpoint that will receive the event payload when the webhook is triggered.
Type The type of webhook. (The type has behavioural implications.) We will be using the GraphQL type.
Query Schema Subscriptions define the conditions of when a webhook should fire and the data contained in its payload.
Headers (optional)
Any headers required when the payload is posted to the URL. (Often used to pass authentication information to the target URL, such as an API key.)
In the below example, I will share a prebuilt example of a GraphQL webhook, but if you want to learn more generally about creating GraphQL webhooks, see the establishing webhooks* *developer guide.
Send a Slack notification when unavailability is requested.
In this example, I will show you how to send a Slack channel notification when an unavailability (time off) request is created. Whilst this example explicitly targets unavailability, the same concept can be applied to nearly any object in the Skedulo data model. To set this up in your Skedulo environment, you will need:
-
A Zapier Account (starter or above). If you don’t have one, you can sign up for their free trial to build out this example.
-
Insomnia (or equivalent REST client).
-
A Skedulo API token.
Create a Zap
If you’re new to Zapier, a Zap is the name of an automated workflow. It’s the ‘recipe’ for a series of steps in an automation. Once you’re logged in, you will notice the big orange “+ Create Zap” button.

The first step in creating your Zap is to define a trigger. In this instance, we will trigger the Zap when the Skedulo Webhook is invoked. So select the “Webhooks by Zapier” trigger and the “Catch Hook” event.

Zapier will then generate a URL that will specifically invoke this automation. Copy this URL and place it in your Skedulo Webhook definition, see the example below.

Create Skedulo Webhook
Once the Zap is ready to test (and you’ve copied the webhook URL), you’re ready to create your Skedulo Webhook. This will notify Zapier every time unavailability is created.
To create a Skedulo Webhook, open your REST client (e.g. Insomnia,Postman, Terminal - for the faint-hearted) and form the following POST request:
curl --request POST \
  --url https://api.skedulo.com/webhooks \
  --header 'Authorization: Bearer $Your_API_Token' \
  --header 'Content-Type: application/json' \
  --data '{
  "name": "NewUnavailability",
  "url": "REPLACE_WITH_YOUR_ZAPIER_URL",
  "type": "graphql",
  "query": "\n    subscription {\n      schemaAvailabilities(operation: INSERT, filter: \"IsAvailable == false\" ) {\n        operation\n        timestamp\n        data {\n          UID\n          Notes\n        Type\n        IsAvailable\n        Start\n        Finish\n        ResourceId\n        }\n        previous {\n          UID\n        }\n      }\n    }\n  "
}'
Some important things to keep in mind at this step:
-
Ensure you have the correct base URL for your region (see regional URLs).
-
Replace the
URLproperty in the JSON body with theURLfrom the previous step. -
Update the
Authorizationheader (in the headers tab) with your Skedulo API token. (Keep the word ‘Bearer’ as a prefix.)
TIP: If you’re new to Insomnia, you can copy this entire request and paste it into the Insomnia request bar and it will set up your request correctly.

Once you’ve got your Webhook creation request finalised, click the Send button and you should get a “200 OK” response back indicating your webhook has been successfully created.
For clarity, this is what the unescaped request looks like:
{
  "name": "NewUnavailability",
  "url": "REPLACE WITH YOUR ZAPIER URL",
  "type": "graphql",
  "query": "
    subscription {
      schemaAvailabilities(operation: INSERT, filter: "IsAvailable == false" ) {
        operation
        timestamp
        data {
                   UID
                       Notes
                       Type
                       IsAvailable
                       Start
                       Finish
                       ResourceId
        }
        previous {
          UID
        }
      }
    }
  "
}
you will notice that in the query property, we are ‘listening’ to the Availability object (schemaAvailabilities), specifically for INSERT operations where the IsAvailable attribute is set to false. You will also notice that in the data object, we are able to specify the attributes included in the payload sent to Zapier.
Testing your webhook
Now that the webhook is established, click “Test Trigger” in Zapier and immediately create unavailability in Skedulo. You ought to quickly see your event sent to your webhook URL.

Fetching additional Resource information (optional)
If you’ve got a keen eye you will notice that we’ve been provided with a Resource ID associated with the request. If you want to include the Resource Name in your Slack notification, then you’ll also want to fetch the associated Resource object. This can be easily done by making a request to the Skedulo GraphQL API.
If you are following along, here is the data body for you to copy and paste in the below request:
{"query":"{resourcesById(UID: \"MERGE_IN_RESOURCE_ID_FROM_STEP_1_HERE\"){UID\nName\nCategory\nPrimaryRegion{\nName}}}"}
You will also need to add the following two request headers (seen in the below example)
-
Authorization: This will be the word Bearer followed by your API token
-
Content-Type: This will always be set to application/json
Remember: Just like when we created the Skedulo Webhook above, you’ll need to make sure you have the correct regional URL set for your request in the URL property.

Format the unavailability dates (optional)
Dates in Skedulo are stored as UTC values, but often users will want these to be formatted to make them more readable. So you can use the Zapier date/time formatter to update the Start and End values. In the below example, I convert the format to MMM DD YYYY HH:mm, which gives me the following result Sep 26 2022, 08:00, but you can set the format to meet your specific requirements. Repeat this step to adjust the finish date too.
Post notification to Slack
You’re now ready to post the notification to Slack. Simply connect your Slack account to Zapier (if you haven’t already) and construct your new channel message.
Test your action, and you should see a beautiful Slack notification arrive.

By this point, you’ve also likely realised that you could post (send) this content to any app listed on the Zapier marketplace (or direct to a custom API if not listed), and you would indeed be correct!
As always, if you have any questions please feel free to comment below or reach out to me on @scottgassmann or the Developer Advocacy team @SkeduloDevs on twitter (We would especially love it if you were to tweet us with your slack notifications all set up!).
Until next time, stay awesome 😎